


.jpg)
I've been thinking a lot about all the renovations
that we have done since moving to the farm
over 2 1/2 years ago.
It seemed like a long time had passed until
I went back through the photo's
and all the memories came flooding back
as if it was yesterday.
I was reminded of the 3+ months we
spent sleeping in our camper in the
back yard as we tore off old baseboards and trim
and sanded horribly rough walls and primed
and primed again then painted...one
coat after another.
Each room was a different color.
Emerald green dining room.
Royal Blue guest room.
Blood Red office/craft room.
Muddy Brown living room.
At least the master bedroom was white!
Above is a photo of the dining room...it was
actually darker than what the photo's show
and all the woodwork other than the trim
was stained and varnished.
Once the ceilings and walls and trim
were painted and crown molding was added
then came the job
of sanding and refinishing the floors.
All of them except the kitchen bathroom
and back porch/laundry room.
Below is a photo of this corner of the
finished dining room.
.jpg)
Below is a photo of the guest bedroom
after it was primed and painted.
It had been a dark Royal Blue.
I can't remember how many coats of primer
and paint it took to cover that blue...
but it was a LOT!
You can also see the unfinished floor.
It was almost an orange red
with areas where the stain had
been worn away.
.jpg)
Below is how it looked after hubby sanded
the floors.
What a difference!
.jpg)
We were shocked at how beautiful the wood
was...the grain was amazing.
Turns out the floors are PECAN.
Below is after I applied the last coat of
Waterlox.
It took 4 coats but it was worth the
effort and the time it took to dry each coat.
It took approximately 7 days
from applying the first coat to moving the
furniture in and I applied each coat to all
floors each time...no stopping.
Below as the last coat was drying.
I went for the satin finish but since
it was still wet it looks quite shiny.
.jpg)
The finished room
.jpg)
Below is the master bedroom.
I did NOT want this to be our room
as it had pull down stairs to the attic
which was right over the bed!
Plus it only had two windows so
was quite dark.
We took the stair out and filled in
the hole and since my hubby works
nights and split sleeps in the morning
and the evening...it works perfectly!
.jpg)
The floor in here is different than the rest of
the house. Most of the room is fir but
one small area in this corner is cedar.
.jpg)
I didn't use the Waterlox in here since it
is a natural finish and I needed something
that would blend the two different colored
floors together. I went with a slightly
tinted polyurethane.
You can still see the difference between the
two woods but not as bad.
.jpg)
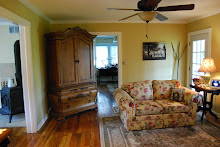
Below is the finished room.
Well the painting and floor is done
but the decorating is not.
Why is it that our own rooms are always
the last to get any attention?!
Oh...if you go back a couple of photo's you'll
see the old ceiling fan. That thing was
wired with a typical electric extension
cord hidden in the attic and wired to the wall switch!
Hubby re-wired it and installed a new
ceiling fan. I'd rather have a pretty light
but with our hot summers the fan
is greatly appreciated.
.jpg)
The photo below shows the dark stain
and varnish that was on the window trim and doors in our bedroom. Also see that un-primed corner
behind the door? That is where the bare
metal furnace vent went up through the
bedroom from the basement to the roof!
.jpg)
.jpg)
Above shows the living room walls after we
took a sander to them. One of the previous owners
had tried their hand at texturing the walls and
there were GLOBS of this stuff that stuck out
nearly an inch with sharp points. We had to sand
it all down to where we liked it and then we
primed and painted it.
Oh...Henrietta and Romeo sneaked in the door
as we were airing out some of the dust.
.jpg)
Above is looking towards that same corner...the floor
has the last coat of finish that is still wet.
Ceiling walls and trim have been painted.
We replaced the solid door with this single
French door.
Below is Romeo peaking into the future
office/craft room.
See how bad the floors were!
You can also see a more true color of the
walls although
they were darker than the photo shows.
.jpg)
The blue scaffolding above around the corner
was our computer desk for a while
and the cooler was my seat.
Good thing I was only following one blog at the time!
.jpg)
The living room floor before and after applying
the Waterlox. Dining room to the right.
The pecan floors run through both bedrooms and the dining room and living room with no seams at the doorways.
I forgot to mention that when we bought the house
the living room floor was covered with plywood
and then 12 inch white tiles with dark grey grout.
Hubby and his brother scraped the tiles off
and tore up the plywood and I filled all the nail
holes. Also if you look to the right in the above
photo you will notice a patch of light boards.
Once the plywood was torn from the original
floor we found a huge hole where an
old in-floor furnace had once been!
When hubby recessed the tiles under
the wood stove he had saved some pecan
boards. We patched the floor with them.
.jpg)
The finished living room.
+copy.jpg)
Dining room floor below looking towards
living room.
.jpg)
Finished room below.
.jpg)
Another view of living room floor looking
towards the dining room to the left
and office/craft room straight ahead.
.jpg)
Below is how the first coat of the Waterlox
changed the color of the pecan wood.
This is a natural finish.
.jpg)
If you are thinking of re-finishing your floors yourself
I would advise you to think it over carefully.
Our floors were in really bad shape with lots of
cuts and gouges to the wood so even after sanding
they did not turn out perfectly.
More sanding would have helped but my husbands
bad back and my bad shoulders did not
allow for the amount of sanding needed to achieve
a really smooth finish.
If you don't mind imperfections then I say
GO FOR IT.
Otherwise...bring in a professional.
We're thrilled with our end results :)
Next to be renovated...kitchen, back porch/laundry.
Eventually ;)


.jpg)


.jpg)


+(2).jpg)


.jpg)

.jpg)


.jpg)

.jpg)


.jpg)
.jpg)


.jpg)
.jpg)


.jpg)
.jpg)

.jpg)
.jpg)
.jpg)

.jpg)


.jpg)
.jpg)
.jpg)
.jpg)
.jpg)

.jpg)

.jpg)


.JPG)


.jpg)
.jpg)


